本文以获取比亚迪实时车况为例,学习Vue3和Css,文章仅供参考
# 1. 前言
比亚迪实时车况能通过抓取微信公众号“比亚迪DiLink—远程控制—实时车况”上的请求url来取得,我们可以通过抓包软件(如LightProxy (opens new window))来查看请求信息,并通过程序模拟请求来获取车辆数据。
此处请当心cookie泄露
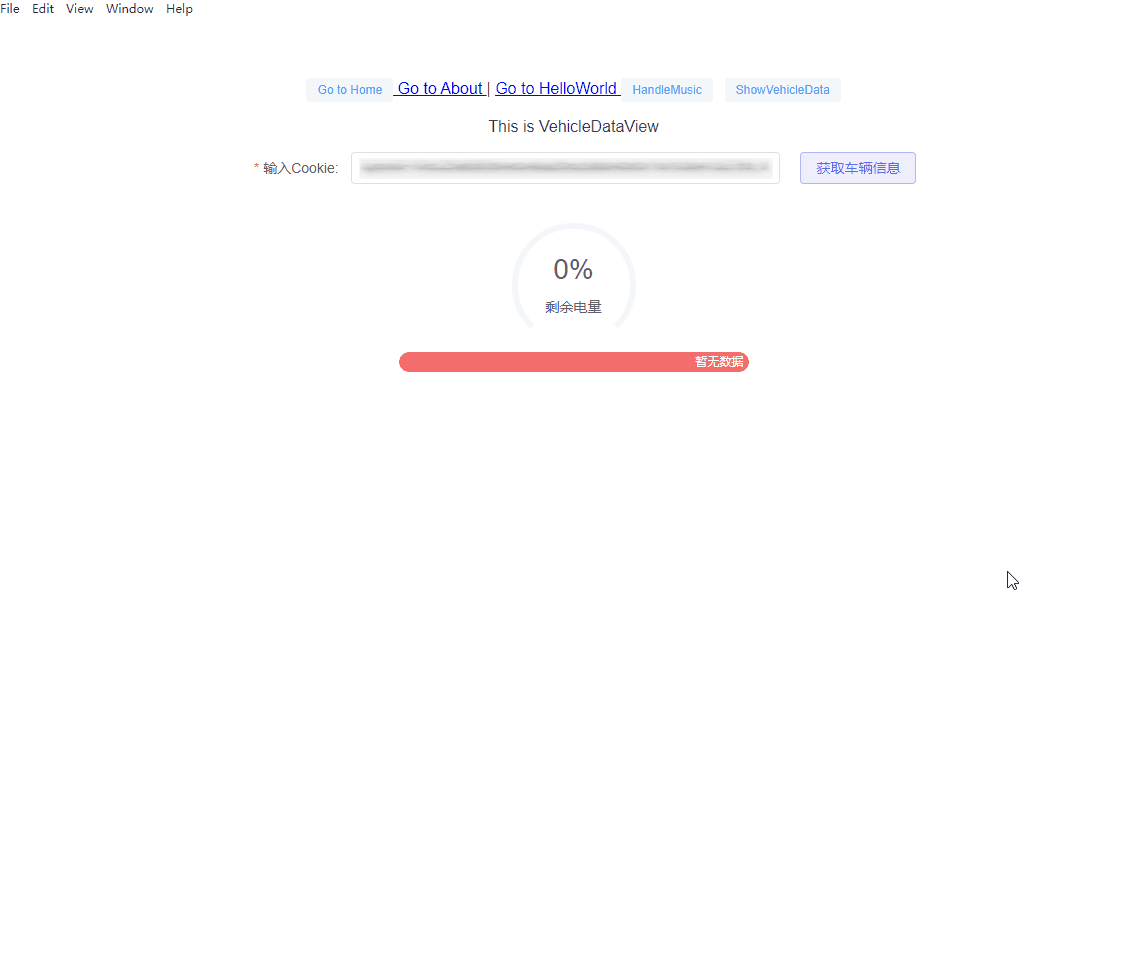
# 效果展示:
# 2. 准备
# 2.1 Electron-Vite模板
使用的是github开源模板electron-vite-vue (opens new window),此模板已集成了vs code的debug环境
# 2.2 集成Element-Plus (opens new window)
# 2.2.1 安装
# 安装
# 选择一个你喜欢的包管理器

# NPM
$ npm install element-plus --save

# Yarn
$ yarn add element-plus

# pnpm
$ pnpm install element-plus
2
3
4
5
6
7
8
9
10
11
# 2.2.2 Vite中引用
// main.ts

// 引入
import ElementPlus from 'element-plus'
import 'element-plus/dist/index.css'
import * as ElementPlusIconsVue from '@element-plus/icons-vue' // 全局引入icon

...
...

// 全局注册所有ElementPlus icon图标
Object.entries(ElementPlusIconsVue).forEach(([key, component]) => {
	app.component(key, component)
})
app.use(ElementPlus)
2
3
4
5
6
7
8
9
10
11
12
13
14
15
# 2.3 集成Axios (opens new window)
# 2.3.1安装
# 使用 npm:
$ npm install axios

# 使用 bower:
$ bower install axios

# 使用 yarn:
$ yarn add axios
2
3
4
5
6
7
8
# 2.3.2 Vite中引用
// main.ts

import axios from 'axios'

...
...

// 方式1,挂载到全局属性
app.config.globalProperties.$http = axios

// 方式2,provide 出去,后面要使用的地方通过 inject 接收
app.provide('$axios', axios)
2
3
4
5
6
7
8
9
10
11
12
# 2.4 集成Pinia (opens new window)
# 2.4.1 安装
# 用你喜欢的包管理器安装 pinia:
yarn add pinia
# 或者使用 npm
npm install pinia
2
3
4
# 2.4.2 Vite中引用
// main.ts

import { createPinia, PiniaPluginContext } from 'pinia'
const pinia = createPinia()

type Options = {
	key?: string
}
const piniaPlugin = (options: Options) => {
	return (context: PiniaPluginContext) => {
		const { store } = context;
		// 解决pinia在setup语法下中使用$reset()报错的问题
		const initialState = JSON.parse(JSON.stringify(store.$state))
		store.$reset = () => {
			store.$state = JSON.parse(JSON.stringify(initialState));
		}
	}
}

//注册pinia 插件
pinia.use(piniaPlugin({
	key: "pinia"
}))
app.use(pinia)
2
3
4
5
6
7
8
9
10
11
12
13
14
15
16
17
18
19
20
21
22
23
24
# 2.4 配置“@”指向“src”目录
// vite.config.ts

import { resolve } from 'path'
...
export default defineConfig({
  resolve: {
    alias: {
      '@': resolve(__dirname, 'src') // 设置 @ 指向 src
    }
  }
})
2
3
4
5
6
7
8
9
10
11
// tsconfig.json

{
  "compilerOptions": {
    ...
    "baseUrl": "./",  // 解析非相对模块的基础地址,默认是当前目录
    "paths": { // 路径映射,相对于baseUrl
      "@/*": ["src/*"]
    },
    ...
    "types": ["element-plus/global"]
  },
  "include": ["src"],
  "references": [
    { "path": "./tsconfig.node.json" }
  ]
}
2
3
4
5
6
7
8
9
10
11
12
13
14
15
16
17
# 3. 开始
# 3.1 接口封装
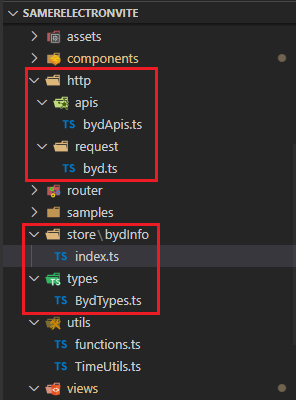
这里对几个地方进行了封装,降低耦合:
# 3.1.1 Http接口
- 开发环境,不能直接请求byd的接口,需要通过代理来实现,所以先配置vite的服务器代理
// vite.config.ts


// https://vitejs.dev/config/
export default defineConfig({
  server: process.env.VSCODE_DEBUG ? {
    host: pkg.debug.env.VITE_DEV_SERVER_HOSTNAME,
    port: pkg.debug.env.VITE_DEV_SERVER_PORT,
    proxy: {
      '/bydApis': {
        target:'https://bydcloud.byd.com',
        changeOrigin: true,
        rewrite: (path) => {
          path = path.replace(/^\/bydApis/, '')
          return path
        },
      }
    }
  } : undefined,
})
2
3
4
5
6
7
8
9
10
11
12
13
14
15
16
17
18
19
20
- 封装一个专门获取比亚迪车辆数据的axios对象,比亚迪所有api请求都通过这个对象创建
// request/byd.ts

import axios from 'axios'

let baseURL = ''
if (import.meta.env.DEV) {
    // 测试环境需要代理
    baseURL = '/bydApis'
} else {
	baseURL = 'https://bydcloud.byd.com'
}
const service = axios.create({
// `baseURL` 将自动加在 `url` 前面,除非 `url` 是一个绝对 URL。
// 它可以通过设置一个 `baseURL` 便于为 axios 实例的方法传递相对 URL
baseURL: baseURL,
// `timeout` 指定请求超时的毫秒数。
// 如果请求时间超过 `timeout` 的值,则请求会被中断
timeout: 60000,
// `withCredentials` 表示跨域请求时是否需要使用凭证
withCredentials: true,
// 自定义请求头
headers: {
		// 设置后端需要的传参类型
		'Content-Type': 'application/json',
		'token': '',
		'X-Requested-With': 'XMLHttpRequest',
		'Access-Control-Allow-Origin': "*",
		// 'User-Agent': `Mozilla/5.0 (Windows NT 6.1; WOW64) AppleWebKit/537.36 (KHTML, like Gecko) Chrome/81.0.4044.138 	Safari/537.36 NetType/WIFI MicroMessenger/7.0.20.1781(0x6700143B) WindowsWechat(0x6307062c)`
	},
})

// 添加请求拦截器
service.interceptors.request.use(
	config => {
		// 在发送请求之前做什么
		return config
	},
	error => {
		// 对请求错误做些什么
		console.error("request use ", error)
		return Promise.reject(error)
	}
)

// 添加响应拦截器
service.interceptors.response.use(
	response => {
		// 2xx 范围内的状态码都会触发该函数。
		// console.log(response);
		const dataAxios = response.data
		return dataAxios
	},
	error => {
		// 超出 2xx 范围的状态码都会触发该函数。
		// console.error("response use ", error)
		return Promise.reject(error)
	}
)

export default service
2
3
4
5
6
7
8
9
10
11
12
13
14
15
16
17
18
19
20
21
22
23
24
25
26
27
28
29
30
31
32
33
34
35
36
37
38
39
40
41
42
43
44
45
46
47
48
49
50
51
52
53
54
55
56
57
58
59
60
- 封装一个所有比亚迪相关api请求的接口,用于http请求
import axios from "../request/byd";
import { CarData, CarLocationData, RealTimeReqParams } from '@/types/BydTypes';

let requestedSerials: number[] = [];

function getRequestSerial() {
	let randNum = getRandNum(-999, 999)
	let loopCount = 0;
	while (requestedSerials.includes(randNum)) {
		randNum = getRandNum(-999, 999)
		loopCount++;
		if (loopCount > 10) {
			throw new Error("GetRequestSerial fail");
		}
	}
	requestedSerials.push(randNum)
}

function getRandNum(min: number, max: number) {
	return Math.floor(Math.random() * (max - min + 1) + min);
}

function getRand32Str() {
	const strs = '1234567890abcdef'
	const randStr = (randNum: number) => {
		let result = ''
		while (randNum-- > 0) {
			result = strs[getRandNum(0, strs.length - 1)] + result;
		}
		return result;
	}
	return `${randStr(8)}-${randStr(4)}-${randStr(4)}-${randStr(4)}-${randStr(12)}`
}

/**
* 获取车辆基本信息
* @param cookie
* @returns
*/
export function apiGetCarInfo(cookie?: string): Promise<any> {
	const random = getRand32Str()
	const timeStamp = new Date().getTime()
	return new Promise((resolve, reject) => {
		axios({
			url: '/wechat/getuserinfo',
			method: 'get',
			params: {
				timeStamp,
				random
			},
			// data: JSON.stringify({ "caridentifier": carId, "autoType": autoType, "energyType": energyType, "requestSerial": requestSerial, "timeStamp": timeStamp, "random": random }),
		})
			.then((res: any) => {
				if (res?.rebackResult == 0) {
					resolve(res?.listInfo)
				} else {
					reject(res)
				}
			})
			.catch((err) => {
				reject(err)
			})
	})
}

/**
* 请求车辆实时数据
* @param apiParams
* @returns
*/
export function apiVehicleRealTimeRequest(apiParams: RealTimeReqParams) {
	const { carId, autoType, energyType } = apiParams
	const requestSerial = getRequestSerial()
	const random = getRand32Str()
	const timeStamp = new Date().getTime()
	return new Promise((resolve, reject) => {
		axios({
			url: '/wechat/Vehicle/vehicleRealTimeRequest',
			method: 'post',
			data: JSON.stringify({ "caridentifier": carId, "autoType": autoType, "energyType": energyType, "requestSerial": requestSerial, "timeStamp": timeStamp, "random": random }),
		})
			.then((res: any) => {
				if (res?.rebackResult == 0) {
					resolve(res)
				} else {
					reject(res)
				}
			})
			.catch((err) => {
				reject(err)
			})
	})
}
...
2
3
4
5
6
7
8
9
10
11
12
13
14
15
16
17
18
19
20
21
22
23
24
25
26
27
28
29
30
31
32
33
34
35
36
37
38
39
40
41
42
43
44
45
46
47
48
49
50
51
52
53
54
55
56
57
58
59
60
61
62
63
64
65
66
67
68
69
70
71
72
73
74
75
76
77
78
79
80
81
82
83
84
85
86
87
88
89
90
91
92
93
94
# 3.1.2 Pinia仓库
创建一个bydInfo仓库,专门处理开放给界面使用的接口和数据,界面中所有的数据都从仓库中取,不用管网络请求等内容
// bydInfo的仓库

// 定义store
import { apiGetCarInfo, apiGetVehicleRealTimeResult, apiVehicleRealTimeRequest, apiGetVehicleLocation } from "@/http/apis/bydApis";
import { RealTimeReqParams, CarData, CarInfo, CarLocationData } from "@/types/BydTypes";
import { awaitWrapper } from "@/utils/functions";
import { ElMessage } from "element-plus";
import { defineStore } from "pinia";

const MAP_RATIO = 0.000001
export const useBydInfoStore = defineStore('bydInfo', {
	state: () => {
		return {
			// 当前cookis
			cookie: '',
			carInfo: null as CarInfo[] | null,
			carData: null as CarData | null,
			carLocationData: null as CarLocationData | null, // 经纬度需要乘以0.000001
		}
	},
	getters: {
		// 非箭头函数,可以使用 this,但是需要注明返回类型
		zlcText(): string {
			return this.carData?.zlc ? `${this.carData?.zlc}km` : '暂无数据'
		},

		// 箭头函数,不可以使用this,需指定state,不用指定返回类型,可以自动推断
		longitude_latitude: (state) => {
			if (state.carLocationData) {
				const longitude = Number((state.carLocationData.longitude * MAP_RATIO).toFixed(6))
				const latitude = Number((state.carLocationData.latitude * MAP_RATIO).toFixed(6))
				return `${longitude},${latitude}`
			}
			return '暂无位置信息'
		},
		locationPosArr: (state) => {
			if (state.carLocationData) {
				return [Number((state.carLocationData.longitude * MAP_RATIO).toFixed(6)), Number((state.carLocationData.latitude * MAP_RATIO).toFixed(6))]
			}
			return [0, 0]
		}
	},
	actions: {
		// 获取车辆信息
		async getCarInfo(cookie: string,) {
			this.cookie = document.cookie = cookie

			const [err, carInfo] = await awaitWrapper(apiGetCarInfo())
			if (err) {
				ElMessage.error('获取车辆信息失败:' + err?.rebackDesc)
				console.warn(err);
				return null
			}
			else {
				carInfo && (this.carInfo = carInfo)
				return carInfo
			}
		},

		async getCarData() {
			if (!this.carInfo || this.carInfo[0] == null) {
				ElMessage.error('请先获取车辆信息')
				return null
			}
			try {
				const apiParams: RealTimeReqParams = {
					carId: this.carInfo[0].vin,
					autoType: this.carInfo[0].autoType,
					energyType: this.carInfo[0].energyType
				}
				const reqRes = await apiVehicleRealTimeRequest(apiParams)
				const result = await apiGetVehicleRealTimeResult(apiParams)
				result && (this.carData = result)
				return result;
			} catch (error: any) {
				ElMessage.error('获取车辆数据失败:' + error?.rebackDesc)
				console.warn(error);

				return null;
			}
		},

		async getCarLocation() {
			if (!this.carInfo || this.carInfo[0] == null) {
				ElMessage.error('请先获取车辆信息')
				return null
			}
			const [err, res] = await awaitWrapper(apiGetVehicleLocation(this.carInfo[0].vin))
			if (err) {
				ElMessage.error('获取车辆位置数据失败:' + err?.rebackDesc)
				console.warn(err);
				return null
			} else {
				res && (this.carLocationData = res)
				return res;
			}
		},

		xhText() {
			if (this.carData?.xh) return this.carData?.xh + 'km'
			return '暂无数据'
		},
	}
});
2
3
4
5
6
7
8
9
10
11
12
13
14
15
16
17
18
19
20
21
22
23
24
25
26
27
28
29
30
31
32
33
34
35
36
37
38
39
40
41
42
43
44
45
46
47
48
49
50
51
52
53
54
55
56
57
58
59
60
61
62
63
64
65
66
67
68
69
70
71
72
73
74
75
76
77
78
79
80
81
82
83
84
85
86
87
88
89
90
91
92
93
94
95
96
97
98
99
100
101
102
103
104
# 3.1.3 工具函数
因为大量使用async-await方法,但不方便抛出错误,所以又封装了一个await的包装器函数用于捕获错误
// functions.ts

/**
 * await包装器,用来async await操作捕获错误
 * @param promise
 * @returns [err, res]
 */
export const awaitWrapper = async (promise: Promise<any>) => {
	try {
		const res = await promise;
		return [null, res];
	} catch (err) {
		return [err, null];
	}
}
2
3
4
5
6
7
8
9
10
11
12
13
14
15
# 3.2 界面编写
# 3.2.1 VehicleDataView
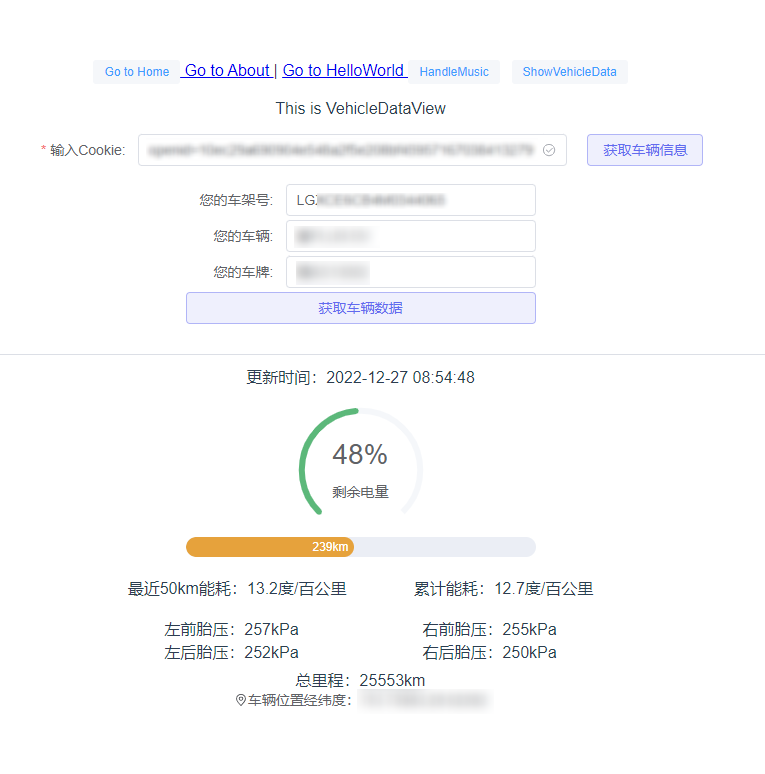
获取车辆信息/数据栏使用的是el-form组件,便于做校验和展示下方
剩余电量和续航使用的是el-progress部分代码如下
<!-- VehicleDataView.vue -->

<!-- template -->
<el-form class="car-form" ref="ruleFormRef" :model="ruleForm" status-icon :rules="formRules" label-width="120px"
label-suffix=":">
<el-form-item class="car-form-cookie" label="输入Cookie" prop="cookieStr">
	<el-input v-model="ruleForm.cookieStr" autocomplete="true" clearable />
</el-form-item>
<el-button class="btn-get-car-info" color="#626aef" plain :loading-icon="Eleme" :loading="!isGetCarInfoEnable"
	@click="onGetCarInfoClick(ruleFormRef)">获取车辆信息
</el-button>
</el-form>

<el-form class="car-form-info" v-if="carInfo" label-width="100px" label-suffix=":">
<el-form-item class="car-form-info-item" label="您的车架号">
	<el-input :value="carInfo[0]?.vin" readonly />
</el-form-item>

<el-form-item class="car-form-info-item" label="您的车辆">
	<el-input :value="carInfo[0]?.autoType" readonly />
</el-form-item>
<el-form-item class="car-form-info-item" label="您的车牌">
	<el-input :value="carInfo[0]?.autoPlate" readonly />
</el-form-item>
<el-button class="btn-get-car-info" color="#626aef" plain :loading-icon="Eleme" :loading="!isGetCarDataEnable"
	@click="onGetCarDataClick(ruleFormRef)">获取车辆数据
</el-button>
</el-form>


<div class="car-data">
    <div class="car-data-time" v-if="carData">
        <el-divider class="divider" />
        更新时间:{{ formatTimestamp(carData.time) }}
    </div>
    <div class="car-data-soc">
        <el-progress :indeterminate="true" type="dashboard" :percentage="carSoc" :color="progressColors">
        <template #default="{ percentage }">
            <span class="percentage-value">{{ percentage }}%</span>
            <br>
            <span class="percentage-label">剩余电量</span>
        </template>
        </el-progress>
    </div>
    <div class="car-data-xh">
        <el-progress :percentage="(carData && carSoc || 100)" :status="progressState" :text-inside="true"
        :stroke-width="20" :format="bydInfoStore.xhText">
        </el-progress>
    </div>
    <div class="car-data-nh" v-if="carData">
        <div>
        最近50km能耗:{{ (carData?.nh) + '度/百公里' }}
        </div>
        <div>
        累计能耗:{{ (carData?.ljnh) }}
        </div>
    </div>
    <div class="car-data-ty" v-if="carData">
        <div class="car-data-ty-top">
        <div>
            左前胎压:{{ (carData?.ltylzzq) + 'kPa' }}
        </div>
        <div>
            右前胎压:{{ (carData?.ltylzyq) + 'kPa' }}
        </div>
        </div>
        <div class="car-data-ty-down">
        <div>
            左后胎压:{{ (carData?.ltylzzh) + 'kPa' }}
        </div>
        <div>
            右后胎压:{{ (carData?.ltylzyh) + 'kPa' }}
        </div>
        </div>
    </div>
    <div class="car-data-zlc" v-if="carData">
        <span>总里程:{{ bydInfoStore.zlcText }}</span>
    </div>
    <div class="car-data-location" v-if="carData">
        <el-link :href="''" icon="Location" @click="onLocationClick">
        <!-- <el-icon><Location /></el-icon> -->
        <span>车辆位置经纬度:{{ bydInfoStore.longitude_latitude }}</span>
        </el-link>
    </div>
</div>

<!-- script -->
<script setup lang="ts">
import { useBydInfoStore } from '@/store/bydInfo'
import AmapContainer from '@/components/Map/AmapContainer.vue'
const bydInfoStore = useBydInfoStore()
// 转为响应式对象,便于原属性值修改后能同步到界面显示
const { carInfo, carData } = toRefs(bydInfoStore)

...

const onGetCarDataClick = async (formEl: FormInstance | undefined) => {
  if (!formEl) return
  formEl.validate(async (valid) => {
    if (valid) {
      isGetCarDataEnable.value = false
	  // 直接调用bydInfo仓库中的接口,只跟仓库交互
      const data = await bydInfoStore.getCarData();
      console.log('carData:', data);
      if (data) {
        ElMessage.success(`车辆数据获取成功`)
        carSoc.value = bydInfoStore.carData?.soc || carSoc.value
      }
      const carLocation = await bydInfoStore.getCarLocation();
      console.log('carLocation:', carLocation);
      if (carLocation) {
        ElMessage.success(`车辆位置获取成功`)
      }
      isGetCarDataEnable.value = true
    }
  })
}
</script>
2
3
4
5
6
7
8
9
10
11
12
13
14
15
16
17
18
19
20
21
22
23
24
25
26
27
28
29
30
31
32
33
34
35
36
37
38
39
40
41
42
43
44
45
46
47
48
49
50
51
52
53
54
55
56
57
58
59
60
61
62
63
64
65
66
67
68
69
70
71
72
73
74
75
76
77
78
79
80
81
82
83
84
85
86
87
88
89
90
91
92
93
94
95
96
97
98
99
100
101
102
103
104
105
106
107
108
109
110
111
112
113
114
115
116
117
118
# 3.2.2 地图组件
# 3.2.2.1 注册成为某地图平台开发者
通过比亚迪api可以获取到车辆位置经纬度信息,所以理论上可以根据经纬度来展示具体位置。
在此我是通过高德开放平台 (opens new window)注册成为开发者,使用高德地图的相关接口来展示地图。
官方接入Vue教程:https://lbs.amap.com/api/jsapi-v2/guide/webcli/map-vue1 (opens new window)
# 3.2.2.2 地图组件编写
考虑到组件的复用性,在设计组件的时候,提供一个位置参数来创建地图组件:
<!-- AmapContainer.vue -->

<template>
	<div id="container"> </div>
</template>

<script lang="ts" setup>
import AMapLoader from '@amap/amap-jsapi-loader';
import { shallowRef } from '@vue/reactivity'
import { onMounted } from 'vue';
let map = shallowRef<any>(null)

interface AmapProps {
	centerPos: Array<number>,
	positionArr?: Array<Array<number>>
}
// 定义组件参数
const props = withDefaults(defineProps<AmapProps>(), {
	centerPos: () => [0, 0]
})

const initMap = () => {
	AMapLoader.load({
		key: import.meta.env.VITE_AMAP_KEY || '',  //设置您的key
		version: "2.0",
		plugins: ['AMap.ToolBar', 'AMap.Driving'],
		AMapUI: {
			version: "1.1",
			plugins: [],

		},
		Loca: {
			version: "2.0.0"
		},
	}).then((AMap) => {
		map = new AMap.Map("container", {
			viewMode: "3D",
			zoom: 18,
			zooms: [2, 22],
			// center: [115.73989, 28.62262],
			center: props.centerPos
		});
		// let positionArr = [
		// 	[115.73989, 28.62262],
		// ];

		let positionArr: Array<Array<number>> = props.positionArr || [];
		if (props.positionArr == null) {
			positionArr = [
				props.centerPos
			]
		}

		for (let item of positionArr) {
			let marker = new AMap.Marker({
				position: [item[0], item[1]],
			});
			map.add(marker);
		}

		// 同时引入工具条插件和比例尺插件
		AMap.plugin([
			'AMap.ToolBar',
			'AMap.Scale',
			'AMap.MapType',
			'AMap.Geolocation',
		], () => {
			// 在图面添加工具条控件,工具条控件集成了缩放、平移、定位等功能按钮在内的组合控件
			// map.addControl(new AMap.ToolBar());

			// 在图面添加比例尺控件,展示地图在当前层级和纬度下的比例尺
			map.addControl(new AMap.Scale());

			// 在图面添加类别切换控件,实现默认图层与卫星图、实施交通图层之间切换的控制
			map.addControl(new AMap.MapType());

			// 在图面添加定位控件,用来获取和展示用户主机所在的经纬度位置
			// map.addControl(new AMap.Geolocation());

			let geolocation = new AMap.Geolocation({
				// 是否使用高精度定位,默认:true
				enableHighAccuracy: true,
				// 设置定位超时时间,默认:无穷大
				timeout: 10000,
				// 定位按钮的停靠位置的偏移量
				offset: [10, 20],
				// 定位成功后调整地图视野范围使定位位置及精度范围视野内可见,默认:false
				zoomToAccuracy: true,
				// 定位按钮的排放位置,  RB表示右下
				position: 'RB'
			})

			geolocation.getCurrentPosition((status: any, result: any) => {
				if (status == 'complete') {
					console.log('complete', result);
				} else {
					console.log('getCurrentPosition err', result);
				}
			});
			map.addControl(geolocation)
		});

		const infoWindow = new AMap.InfoWindow({
			anchor: 'top-center',
			content: '车辆位置',
		});

		infoWindow.open(map, props.centerPos);
	}).catch(e => {
		console.error(e);
	})
}

onMounted(() => {
	initMap()
})
</script>

<style scoped lang="less">
#container {
	padding: 0px;
	margin: 0px;
	width: 100%;
	height: 800px;
}
</style>
2
3
4
5
6
7
8
9
10
11
12
13
14
15
16
17
18
19
20
21
22
23
24
25
26
27
28
29
30
31
32
33
34
35
36
37
38
39
40
41
42
43
44
45
46
47
48
49
50
51
52
53
54
55
56
57
58
59
60
61
62
63
64
65
66
67
68
69
70
71
72
73
74
75
76
77
78
79
80
81
82
83
84
85
86
87
88
89
90
91
92
93
94
95
96
97
98
99
100
101
102
103
104
105
106
107
108
109
110
111
112
113
114
115
116
117
118
119
120
121
122
123
124
125
126
# 3.2.2.3 组件调用
为了方便动态地调出地图组件,使用vue中的h函数和render函数来动态渲染:
// VehicleDataView.vue

const onLocationClick = () => {
  if (bydInfoStore.carLocationData) {
    locationDlgVisible.value = true
    _alertMapDlg()
  }
}

// 使用 ElDialog 组件包裹地图组件
const _alertMapDlg = () => {
  const container = document.createElement('div')
  // 这里有个问题:ElDialog每弹出一次,遮罩(el-overlay)都会增加一个,不会自动remove掉
  const dialogVnode = h(
    ElDialog,
    {
      modelValue: locationDlgVisible.value,
      alignCenter: true,
      appendToBody: true,
      title: '车辆位置',
      width: '80%',
      destroyOnClose: true,
      onClosed: () => {
        if (container) {
          container.remove()
          locationDlgVisible.value = false
        }
      }
    },
    {
      // 不使用default插槽会报提醒
      default: () => {
        return [
          h(
            AmapContainer,
            {
              centerPos: bydInfoStore.locationPosArr,
            }
          )
        ]
      }
    }
  )
  render(dialogVnode, container)
  document.body.appendChild(container)
}
2
3
4
5
6
7
8
9
10
11
12
13
14
15
16
17
18
19
20
21
22
23
24
25
26
27
28
29
30
31
32
33
34
35
36
37
38
39
40
41
42
43
44
45
46
# 3.3 敏感key封装
为了方便个人测试,程序中包含了默认的cookie和高德地图开发者key,而这些敏感数据又不能明文上传到git仓库中,好在Vite提供了.env文件 (opens new window)用于定制不同模式下的环境变量:
.env                # 所有情况下都会加载
.env.local          # 所有情况下都会加载,但会被 git 忽略
.env.[mode]         # 只在指定模式下加载
.env.[mode].local   # 只在指定模式下加载,但会被 git 忽略
2
3
4
环境加载优先级
一份用于指定模式的文件(例如 .env.production)会比通用形式的优先级更高(例如 .env)。 另外,Vite 执行时已经存在的环境变量有最高的优先级,不会被 .env 类文件覆盖。例如当运行 VITE_SOME_KEY=123 vite build 的时候。 .env 类文件会在 Vite 启动一开始时被加载,而改动会在重启服务器后生效。
所以在项目中,创建了一个.env.local文件,用于指定cookie和key
# .env.local

VITE_MY_BYD_COOKIE = 'xxxx'
VITE_AMAP_KEY = 'xxxx'
2
3
4
安全注意事项
.env.*.local文件应是本地的,可以包含敏感变量。你应该将.local添加到你的.gitignore中,以避免它们被 git 检入。- 由于任何暴露给 Vite 源码的变量最终都将出现在客户端包中,
VITE_*变量应该不包含任何敏感信息。
为了ts的智能提示,需要配置env.d.ts文件
// env.d.ts文件

/// <reference types="vite/client" />

declare module '*.vue' {
  import type { DefineComponent } from 'vue'
  // eslint-disable-next-line @typescript-eslint/no-explicit-any, @typescript-eslint/ban-types
  const component: DefineComponent<{}, {}, any>
  export default component
}

interface ImportMetaEnv {
  readonly VITE_ENV: string
  readonly VITE_MY_BYD_COOKIE: string
  readonly VITE_AMAP_KEY: string
  // 更多环境变量...
}

interface ImportMeta {
  readonly env: ImportMetaEnv
}
2
3
4
5
6
7
8
9
10
11
12
13
14
15
16
17
18
19
20
21
在界面中使用
// AmapContainer.vue

AMapLoader.load({
	key: import.meta.env.VITE_AMAP_KEY || '',  //设置您的key
    ...
})

// VehicleDataView.vue
const ruleForm = reactive<AutoRuleForm>({
  cookieStr: import.meta.env.VITE_MY_BYD_COOKIE || '',
})
2
3
4
5
6
7
8
9
10
11
# 4. 问题和总结
目前已知问题:
打包后的正式环境无法使用,原因是正式环境中无法设置服务器返回的cookie:
Specify
SameSite=NoneandSecureif the cookie is intended to be set in cross-site contexts. Note that only cookies sent over HTTPS may use theSecureattribute.即同站策略问题,解决方法有:
修改浏览器设置:
1> chrome地址栏输入
chrome://flags2> 通过禁用“
SameSite by default cookies”和“Cookies without SameSite must be secure”功能开关3> 重新启动浏览器
这一点不适用于打包后的Electron应用
Set-Cookie:SameSite=None
就是将response的header设置Set-Cookie:SameSite=None,因为响应是比亚迪api返回,所以我们做不了处理
Nginx做网站映射(转发)
这点可以实现
该项目主要目的是基于Electron编写Vue3界面,通过获取比亚迪车辆实况数据的例子来封装各层逻辑,并练习Css(主要是flex布局)。
项目已开源https://github.com/LazerChing/SamerElectronVite (opens new window),代码供参考